Tuesday, November 11, 2008

The Second Floor

I recently had the week off from work, and spent most of the time working on the house.  Here's pretty much what i had at the beginning of the week:


By the end of the week, I had all of the second floor support pieces in place:


Or, if you're looking down from the top, here it is again.  I put a bunch of plywood down so you can walk on the second floor.  


I also got all the remaining rafters cut for the house, and they are HEAVY.  I got kinda spoiled doing the second floor supports as they are 8x8" beams.  The Rafters are 10x10's, and very wet because they were cut down specifically for me at 19 feet long.  

So, six more rafters, and thirty purlins will complete the frame part of the house.  Just need some land to keep building.  

Monday, September 15, 2008

Floor Joists 101

All of the houses floor joists are complete.  Fortunately I was able to make jigs that allowed almost all of the work to be done by router.  

Each end is cut into a dovetail shape, with 1" long shoulders behind them.  These fit right into corresponding spots on each tie beam.


To the left, you can see some of the completed pieces.  Unfortunately, you can also see some of the blue stain.  I had these things stacked and stickered, but mother nature decided it needed to rain virtually every day.  What can you do, I'm not making new ones.  I will say though that when the beams get oiled and some sun on them, the staining doesn't look too bad.  Most of the time anyway.


Here are some of the joists installed.  They went together really easily (especially with a crane).  They are 31" on center.  Per one of the books I have, 30" is what you should go for from an aesthetic standpoint anyway.  31" is close enough, and gave me even spacing.


This is the top view of an installed floor joist.  When final assembly comes along, you drive a wedge on each side of the dovetail.  This will pull each piece tight with the tie beam, and ensure that the joists never move.  

Monday, August 18, 2008

More Frames

The frame is really starting to look like something now.  Bents number two and three are standing (the first floor portions only).  
As you can see, its getting kind of hard to make it all fit into one picture.  It's kind of neat to see it taking shape, and I'm starting to get a feel for the size of the place.  

I originally planned to cut in all of the knee braces that will be on the outsides, but I found out that the concrete floor is about an inch out of level.  So, I think I will wait until the house is standing on it's foundation before I add those pieces.  I did cut in all of the dovetails to hold the floor joists, which I am making right now.  The picture below shows them in what will be bent number three.

My plan for now is to install all my joists between bents two and three, and brace the thing with 2x4's so it can't move.  Next I will pull the connecting pieces out from between bents one and two (the cathedral ceiling bay).  This will let me slide bents 2&3 towards number 1, giving me room to stand up bent 4.  Then I will make more floor joists between bents 3&4.

That last paragraph is probably confusing- give me a couple of weeks, and the pictures will make sense of it.  
This next photo is taken by me standing on the corner of bent three.  I think it gives a good perspective of the size of this thing.


Monday, July 21, 2008

Building away...

It's been a while since my last posting, but things are progressing well.  I didn't make my self imposed end of June deadline for having all the bents up, but that's OK.

In the picture are some of the pieces I have been working on.  I've completed the first floors of the three remaining bents (not the floor joists), and they just need to be assembled.  

Unfortunately, that used up all of my last timber order.  I ordered all of the floor joists which are all 6 by 8's.  It will be nice to hack away at something a little lighter for a change.

I just bought a trailer hitch for my car, so I was able to pull this latest load back to the shop myself.  Didn't work bad for such a little car.  Actually, I'm kidding, I just hooked up the car for the picture.  Thanks again Alan for towing the beams for me.

So, for now I need to assemble and stand up the three remaining bents.  When that is done I will make all of the floor joists and set them in place.  More pictures will follow as the bents get put up.

Sunday, June 8, 2008

More Pieces

With another load of beams in hand, things are rolling now. I picked up the beams last weekend, and immediately put anchorseal on all the ends to hopefully minimize cracking. The plan is to build the rest of the first floor, less the floor joists by the end of June. I think if I really bust my ass, I can get it done, but we will see.


I'm fairly well prepared- all of the knee braces are built, and should be exactly the same to make installation easier.


My plan this time around is to mass produce all of the same parts at once, and then assemble it. This should make things go faster, and will probably lead to fewer mistakes. As of this weekend, I am working on posts, and have almost 4 of the remaining 6 done.


We also got the final rafter up on the completed bent. It will need some adjustment for the final installation, but all in all, I think it looks pretty good.

Sunday, May 18, 2008

It Stands

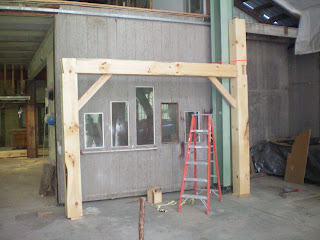
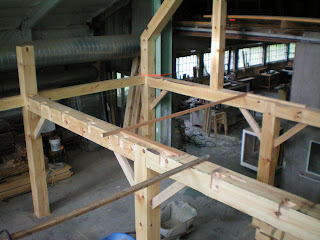
Had a very productive weekend. Most of bent number one is standing in the shop. Eventually, three of the four bents can stand up inside. It's pretty exciting to see it standing. Alan, thanks for the help, I couldn't have done it without you.


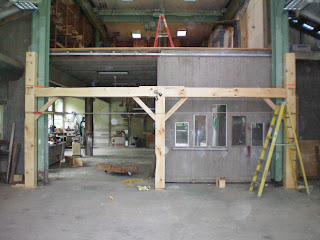
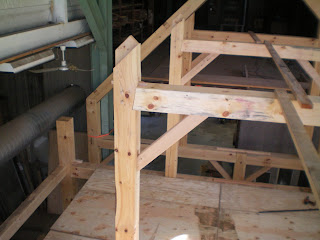
Above is the first piece of the second floor. Everything is ratchet-strapped to the green I-beams for support.


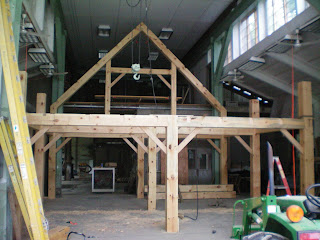
Above is the finished first floor. That was the easy part. There are two overhead cranes that run on three phase power that came in handy for the rest of the pieces. Too bad there's currently no three phase power to operate them. But that's OK; come-alongs worked well.


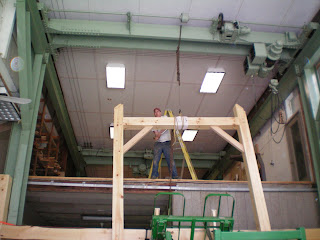
That's me using a come-along to get the first piece of the second floor into position.


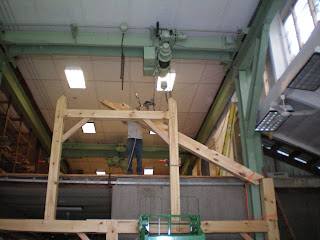
The rafter above was a lot of work to get into position. We had a few come-alongs on the beam to make it tilt. I have no idea how much it weighs- but it's a lot.


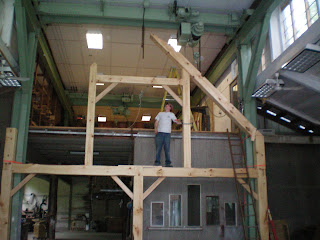
With the rafter finally in place; there's me again for perspective as to how big the frame is. I was a little worried that the knee braces would be too low, and that tall people would hit their heads. I'm about 6'1", and have room to spare, so that was a relief. If by chance someone does whack their head, they're too tall anyway, so it'll serve them right.

Thursday, May 8, 2008

Bent is finished

Finally finished bent #1. Only three to go, plus all the joists and purlins. I think with the warmer temperatures and little bit of experience I now have, the rest will go quicker.


Above are the final pieces of bent #1. The joints where the two beams join are called scarf joints, and are a lot of work to make. There is no simple way to do it, and much of the work is done by hand. If you zoom in on the picture, you can see how it works- you drive a wedge in from each side at the middle of the joint, and they're almost impossible to get apart. (Especially when you only have access to one side. Don't ask how I know this.)

The reason I had to do scarf joints in the first place was because logs ~18 feet long are hard to come by, but 16 feet are fairly common. For the next three bents I'm going to find logs 18 feet long if I have to cut them down myself. It will be much quicker.


So here's a shot of the completed bent. Not too bad hey? Unfortunately, I am now out of beams. My sawyer doesn't have my next order complete yet, and is actually trying to find logs big enough. So, I picked up a bunch of wood to make all the knee braces I will need, so I will have them in inventory as I go. I will probably grab some lumber this weekend and try to make a bunch of pegs for when I get to that point. Gotta stay busy.