Tuesday, November 11, 2008

The Second Floor

I recently had the week off from work, and spent most of the time working on the house.  Here's pretty much what i had at the beginning of the week:


By the end of the week, I had all of the second floor support pieces in place:


Or, if you're looking down from the top, here it is again.  I put a bunch of plywood down so you can walk on the second floor.  


I also got all the remaining rafters cut for the house, and they are HEAVY.  I got kinda spoiled doing the second floor supports as they are 8x8" beams.  The Rafters are 10x10's, and very wet because they were cut down specifically for me at 19 feet long.  

So, six more rafters, and thirty purlins will complete the frame part of the house.  Just need some land to keep building.  

Monday, September 15, 2008

Floor Joists 101

All of the houses floor joists are complete.  Fortunately I was able to make jigs that allowed almost all of the work to be done by router.  

Each end is cut into a dovetail shape, with 1" long shoulders behind them.  These fit right into corresponding spots on each tie beam.


To the left, you can see some of the completed pieces.  Unfortunately, you can also see some of the blue stain.  I had these things stacked and stickered, but mother nature decided it needed to rain virtually every day.  What can you do, I'm not making new ones.  I will say though that when the beams get oiled and some sun on them, the staining doesn't look too bad.  Most of the time anyway.


Here are some of the joists installed.  They went together really easily (especially with a crane).  They are 31" on center.  Per one of the books I have, 30" is what you should go for from an aesthetic standpoint anyway.  31" is close enough, and gave me even spacing.


This is the top view of an installed floor joist.  When final assembly comes along, you drive a wedge on each side of the dovetail.  This will pull each piece tight with the tie beam, and ensure that the joists never move.  

Monday, August 18, 2008

More Frames

The frame is really starting to look like something now.  Bents number two and three are standing (the first floor portions only).  
As you can see, its getting kind of hard to make it all fit into one picture.  It's kind of neat to see it taking shape, and I'm starting to get a feel for the size of the place.  

I originally planned to cut in all of the knee braces that will be on the outsides, but I found out that the concrete floor is about an inch out of level.  So, I think I will wait until the house is standing on it's foundation before I add those pieces.  I did cut in all of the dovetails to hold the floor joists, which I am making right now.  The picture below shows them in what will be bent number three.

My plan for now is to install all my joists between bents two and three, and brace the thing with 2x4's so it can't move.  Next I will pull the connecting pieces out from between bents one and two (the cathedral ceiling bay).  This will let me slide bents 2&3 towards number 1, giving me room to stand up bent 4.  Then I will make more floor joists between bents 3&4.

That last paragraph is probably confusing- give me a couple of weeks, and the pictures will make sense of it.  
This next photo is taken by me standing on the corner of bent three.  I think it gives a good perspective of the size of this thing.


Monday, July 21, 2008

Building away...

It's been a while since my last posting, but things are progressing well.  I didn't make my self imposed end of June deadline for having all the bents up, but that's OK.

In the picture are some of the pieces I have been working on.  I've completed the first floors of the three remaining bents (not the floor joists), and they just need to be assembled.  

Unfortunately, that used up all of my last timber order.  I ordered all of the floor joists which are all 6 by 8's.  It will be nice to hack away at something a little lighter for a change.

I just bought a trailer hitch for my car, so I was able to pull this latest load back to the shop myself.  Didn't work bad for such a little car.  Actually, I'm kidding, I just hooked up the car for the picture.  Thanks again Alan for towing the beams for me.

So, for now I need to assemble and stand up the three remaining bents.  When that is done I will make all of the floor joists and set them in place.  More pictures will follow as the bents get put up.

Sunday, June 8, 2008

More Pieces

With another load of beams in hand, things are rolling now. I picked up the beams last weekend, and immediately put anchorseal on all the ends to hopefully minimize cracking. The plan is to build the rest of the first floor, less the floor joists by the end of June. I think if I really bust my ass, I can get it done, but we will see.


I'm fairly well prepared- all of the knee braces are built, and should be exactly the same to make installation easier.


My plan this time around is to mass produce all of the same parts at once, and then assemble it. This should make things go faster, and will probably lead to fewer mistakes. As of this weekend, I am working on posts, and have almost 4 of the remaining 6 done.


We also got the final rafter up on the completed bent. It will need some adjustment for the final installation, but all in all, I think it looks pretty good.

Sunday, May 18, 2008

It Stands

Had a very productive weekend. Most of bent number one is standing in the shop. Eventually, three of the four bents can stand up inside. It's pretty exciting to see it standing. Alan, thanks for the help, I couldn't have done it without you.


Above is the first piece of the second floor. Everything is ratchet-strapped to the green I-beams for support.


Above is the finished first floor. That was the easy part. There are two overhead cranes that run on three phase power that came in handy for the rest of the pieces. Too bad there's currently no three phase power to operate them. But that's OK; come-alongs worked well.


That's me using a come-along to get the first piece of the second floor into position.


The rafter above was a lot of work to get into position. We had a few come-alongs on the beam to make it tilt. I have no idea how much it weighs- but it's a lot.


With the rafter finally in place; there's me again for perspective as to how big the frame is. I was a little worried that the knee braces would be too low, and that tall people would hit their heads. I'm about 6'1", and have room to spare, so that was a relief. If by chance someone does whack their head, they're too tall anyway, so it'll serve them right.

Thursday, May 8, 2008

Bent is finished

Finally finished bent #1. Only three to go, plus all the joists and purlins. I think with the warmer temperatures and little bit of experience I now have, the rest will go quicker.


Above are the final pieces of bent #1. The joints where the two beams join are called scarf joints, and are a lot of work to make. There is no simple way to do it, and much of the work is done by hand. If you zoom in on the picture, you can see how it works- you drive a wedge in from each side at the middle of the joint, and they're almost impossible to get apart. (Especially when you only have access to one side. Don't ask how I know this.)

The reason I had to do scarf joints in the first place was because logs ~18 feet long are hard to come by, but 16 feet are fairly common. For the next three bents I'm going to find logs 18 feet long if I have to cut them down myself. It will be much quicker.


So here's a shot of the completed bent. Not too bad hey? Unfortunately, I am now out of beams. My sawyer doesn't have my next order complete yet, and is actually trying to find logs big enough. So, I picked up a bunch of wood to make all the knee braces I will need, so I will have them in inventory as I go. I will probably grab some lumber this weekend and try to make a bunch of pegs for when I get to that point. Gotta stay busy.

Sunday, April 20, 2008

Faux Pas

So I finally got one of the rafters built. I started off on the wrong foot by putting a mortise an inch off from where it should be, so I glued in a block, and it won't show.


One end of the rafter has a "birds mouth" joint which is a bit of a pain to cut, but finally I got it done. Since the rafter is a bit shorter than what is needed, the other end of this piece has a scarf joint- which is a big pain in the ass to cut.


Above is the Birds mouth joint; and here's the scarf joint:


Below is the rafter installed. I made a router jig to cut in the joints where the purlins will be.


A few more pieces, and this bent will be complete. My next order of timbers is almost done. I'm planning to build the whole first floor, and stand it up inside. When that's done, I'll do the same with the rest of the raters.

Sunday, April 6, 2008

On the Money

It's been a slow couple of weeks. Fortunately, this weekend turned out to be sunny and nice, and I got a lot accomplished.


The first thing I did was test fit the queen posts and collar tie. I ran strings where the rafters will sit according to my drawings. Everything lined up perfectly. In fact, I measured from the base of the center post to where the top of the peak will be, and it was only off 1/8 of an inch. Not too bad if you ask me.


Then I took the whole thing apart, and made the final cuts on the queen posts. Now it reassembled waiting for the rafters. This first bent is almost done. I've also almost worked myself out of beams. I need to place an order so I can continue.

Monday, March 17, 2008

Assembly

Busy weekend- I put together the first floor of bent 1. Since this was the first and I wanted to be extra careful I started by assembling the whole thing without knee braces. When I got everything square, I dry fit the knee braces, and marked where each would fit.


Then I took the whole thing apart, and cut the mortises for the knee braces. Below is a couple pictures of the final assembly with the knee braces installed. Kind of cool to have all the pieces start to look like something.


Next up will be queen posts, thankfully built from smaller beams. Ten by ten timbers are very heavy to muscle around by hand.

Monday, March 10, 2008

Back to work

This weekend I got quite a bit done. I'm hoping to have the first floor of the bent I'm building ready to assemble soon. I hadn't made any knee braces yet, so it was time. I made a few jigs to make things easier in the future, and whipped out four. There's a farmer down the street who has a small sawmill, and sells some lumber. I picked up some hemlock pieces for next to nothing, and they came out fine. The plan will be to mass produce all I will need for the whole house the next time.


I also have almost completed the girts for the first bent. I had to break down and buy a timber framing chisel from barrtools.com which according to the books I've read are among the best. I bid on a few old ones on Ebay, but they were going for half the price of a new one, plus I'd have to go through turning a new handle. Simpler and probably better to order a new one. I think it will make life much easier for me, as I had been using standard chisels up to this point.

I have a slick to use as well, but you can't hammer on that handle. One of the tenons I made this weekend was on a beam that has a big knot going about lengthwise, and I had a tough time getting the tenon shaped correctly with small chisels and a slick.


This is one of two completed girts. Almost completed anyway, just a few steps left to go. I am a little concerned about the tenons that will mount on the center post. They are only five inches long each; should be OK but I'm still worried. I may rout in a hidden channel between the girts where I could mount a metal plate and lag the two girts together. Probably unnecessary, but will make me feel much better when I can't sleep some night, and am staring at the ceiling.

Saturday, March 1, 2008

It's cold, and I'm busy at work

I haven't got a lot done lately. The past weekend was cold, and I had to work.


It also slows you down to have to melt ice with a salamander before you start cutting. Oh well, Spring is coming. I made the center post of bent 1, and it came out pretty well.


Next up; tie beams. Stay Tuned

Monday, February 18, 2008

The first beams

It's been a busy long weekend. After measuring several extra times, I made my first mortise ever.


This is the antique mortiser I am using. I got it off Ebay for not much, and it works pretty well. The first holes were off no more than 1/16" going through a ten inch beam. Not bad in my opinion. once all the holes were drilled out, I roughed out the mortise with a skilsaw, and chiseled out the rest. I was able to borrow a big corner chisel and a slick from my grandfather- thanks gramps! They work well but the mallet I had was too small.


So, I dug out a piece of firewood, and made this thing on a lathe (again, thanks gramps). We had a hell of a time getting the thing to spin on the lathe without jumping all around, but eventually we got it. It's quite a weapon- I haven't hit a finger yet, but give me time.

The rest of the weekend was spent on the first two posts. One is complete, and the other is almost there. My planing idea from a previous entry worked, and I think it looks pretty nice. I'm using danish oil for a finish, and I've found that the best way to apply it is with a spray bottle. I let it sit for a while, and come back a few hours later to wipe off the excess. One of the finished posts is shown below, pre-oil.

Tuesday, February 12, 2008

Planer Blades

Hand held planers for timber framing are very expensive. Rather than buy one, I am going to try and use a standard 3 1/4" planer, and just round the blades a little bit. This will keep the blade corners from digging into the beams, and will hopefully give kind of a hand-hewn look.


This is the jig I came up with to grind the planer blades. Just an old angle grinder, and some scrap wood. The darker piece of wood at the 45 degree angle will swing like a pendulum while holding the blade.


This is the first blade after being ground. They won't be perfect I'm sure, but we'll see how it works. The photo below shows the first ground blade against the unground one for comparison.

Thursday, February 7, 2008

The First Beams

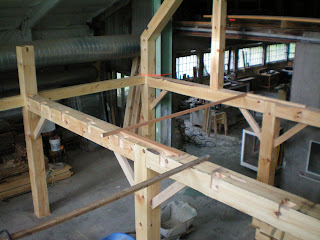
As I mentioned before, I am building one bent to "see how it goes". I've worked with a sawyer in town in the past, and he does a great job. He's a very careful guy, and his prices are reasonable. I placed the order a few weeks ago now, and just got the beams back to the shop.


The photo at left shows my logs before they were sawn. The logs are white pine, very common in VT, and easy to work with, except for the pitch that sticks to everything.

Since i don't have a pickup truck, and these beams are a little too heavy for the roof rack of a Corolla, i was lucky enough to enlist my uncle Alan in transporting the finished beams.


All the beams in this batch are 10"x10", and heavy as hell. Unfortunately, we had an ice storm just before we got to pick up the beams. They were all covered in ice, and slipping all over the place.

When we got the beams back to the shop, we put them on an old haywagon, and covered them with a tarp.

Since the beams are so big, they would be to tall to work on efficiently on a regular sawhorse. So I built these little ones that are about 24" off the ground.

they're made out of maple and seem pretty strong. With beams on top they're the perfect height to work at, so i don't have to stoop. Gotta go easy on the spine- It'll be plenty sore moving the beams around, haha.

Here's the finished product carrying the two beams I intend to be the posts of bent number one.


The shop isn't heated, but it's still a little above freezing in there. A few days and hopefully these first two beams will be dried out, and ready to work on.

Making a B.F.H.


Since I'm going to be making enormous timbers join together, I need a big hammer. What I came up with is made out of one piece of fire wood and a stick- but it works:


First thing was to make the chunk of firewood square-ish and drill out a hole for the handle. It took a while with a hole saw, but hey, thats what I had on hand.


The handle is just a long piece of firewood that was lying around that I made fit. I think it turned out pretty well. It is certainly heavy enough... I wouldn't want to drop it on my foot.

Wednesday, February 6, 2008

Background

Here's the deal: I need a place to live. I've always liked timberframe houses, and have always liked building things. So... it seemed logical to try and build my own timberframe house.

Since I really have no idea what I'm doing, I've been reading books on the subject (Building the Timber Frame House by Ted Benson, and A Timber Framer's Workshop by Steve Chappell). Both excellent books by the way.

After reading both books several times, it was time to start designing. I found the very useful and free GOOGLE SKETCHUP online, and proceeded to design with the following basic guidelines:

1. Keep it simple- No super fancy frames, shapes, etc. After all this is my first attempt.
2. Keep the size small, and the costs low.
3. Make the place as nice as possible while meeting the first two objectives.

Using Sketchup- Here is what I came up with:
I'll admit to already having a few changes in mind... but that's OK. I will keep this blog updated as I change things and get them redesigned.

The frame will be 24'x32', and have a master bedroom on the second floor. Other than that, no floor plan is designed at this point.

Since I have no prior timberframing experience, I have ordered only timbers enough to build one bent- if all goes well I will continue. If all does not go well, I'm only out a few hundred dollars, and a lot of my free time. Stay tuned for more pictures and to see how the construction progresses.